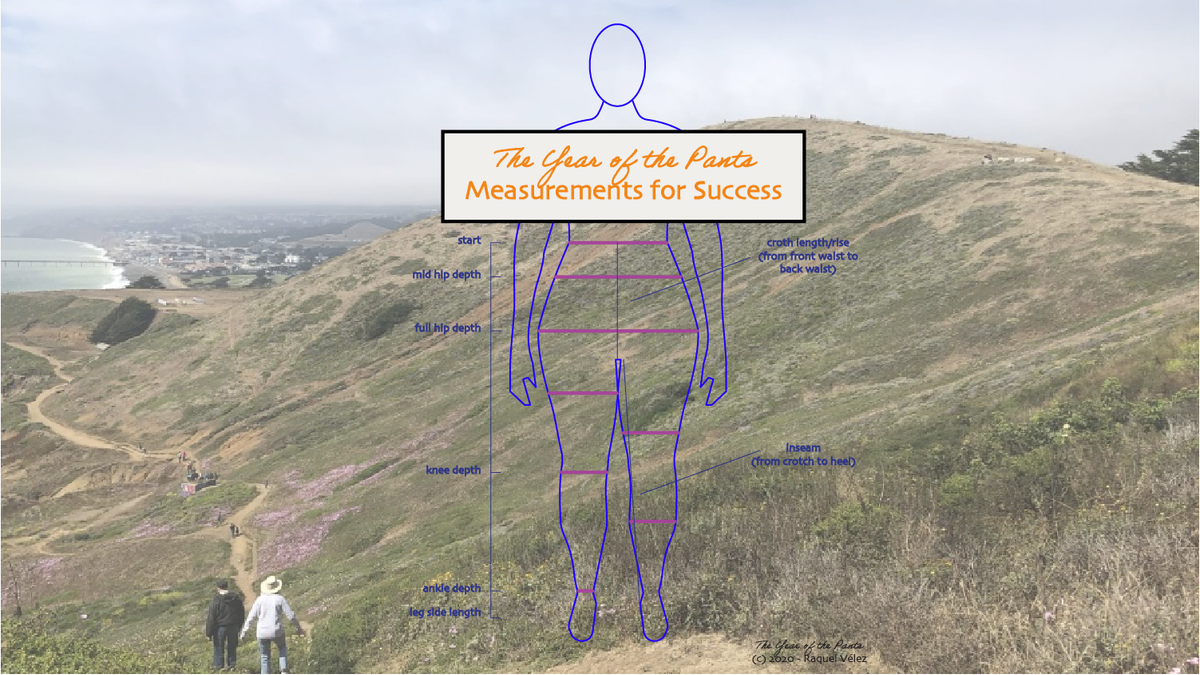
Measurements for Success

This post is part of a series called 2020: The Year of the Pants. Catch all of the posts via the YOTP tag.
Before we can make a pattern, we need really good measurements. It's important to take these well, as being off by even a quarter of an inch or half a centimeter can really throw off the entire pattern! I highly recommend finding a buddy who you are comfortable enough with to get pretty close to. Or find a tailor, if you want the professional touch. Fortunately, even if your measurements are off, you can fix the pattern in retrospect (though it will require more fit prototypes to get to the correct fit).
A couple of notes:
- I've made a bunch of pictures to help illustrate what I mean; note that they are based off of my own measurements, and have been adapted from generated images made via MyBodyModel.com. Bear in mind that none of these measurements are exclusive to any consideration of gender. We've all got stuff in different places; the numbers help ensure that every bit of you is as comfortable as possible in your final garment!
- The numbers are just that: numbers. They're not good or bad. You'll be tempted to compare them to other numbers - please don't bother. Your body has held you together for your entire life, and it deserves your love and support as well! I won't tell you what to do, you can do whatever you want, but trust me: comparing your measurements to someone else or even your past self will only put you in a judgey mood. Do yourself a favor and simply acknowledge that this is where your body is right now, and it may or may not change, and that's okay. ❤️
Ok, back to measuring!
Before starting, it's helpful to a have a few visual guides that don't move on your body as reference points. This is often achieved with some elastic - most books recommend using one piece for your waist; I had a teacher recommend a second for the widest part of the hip, aka the low hip (yep, juicy bits and all!).
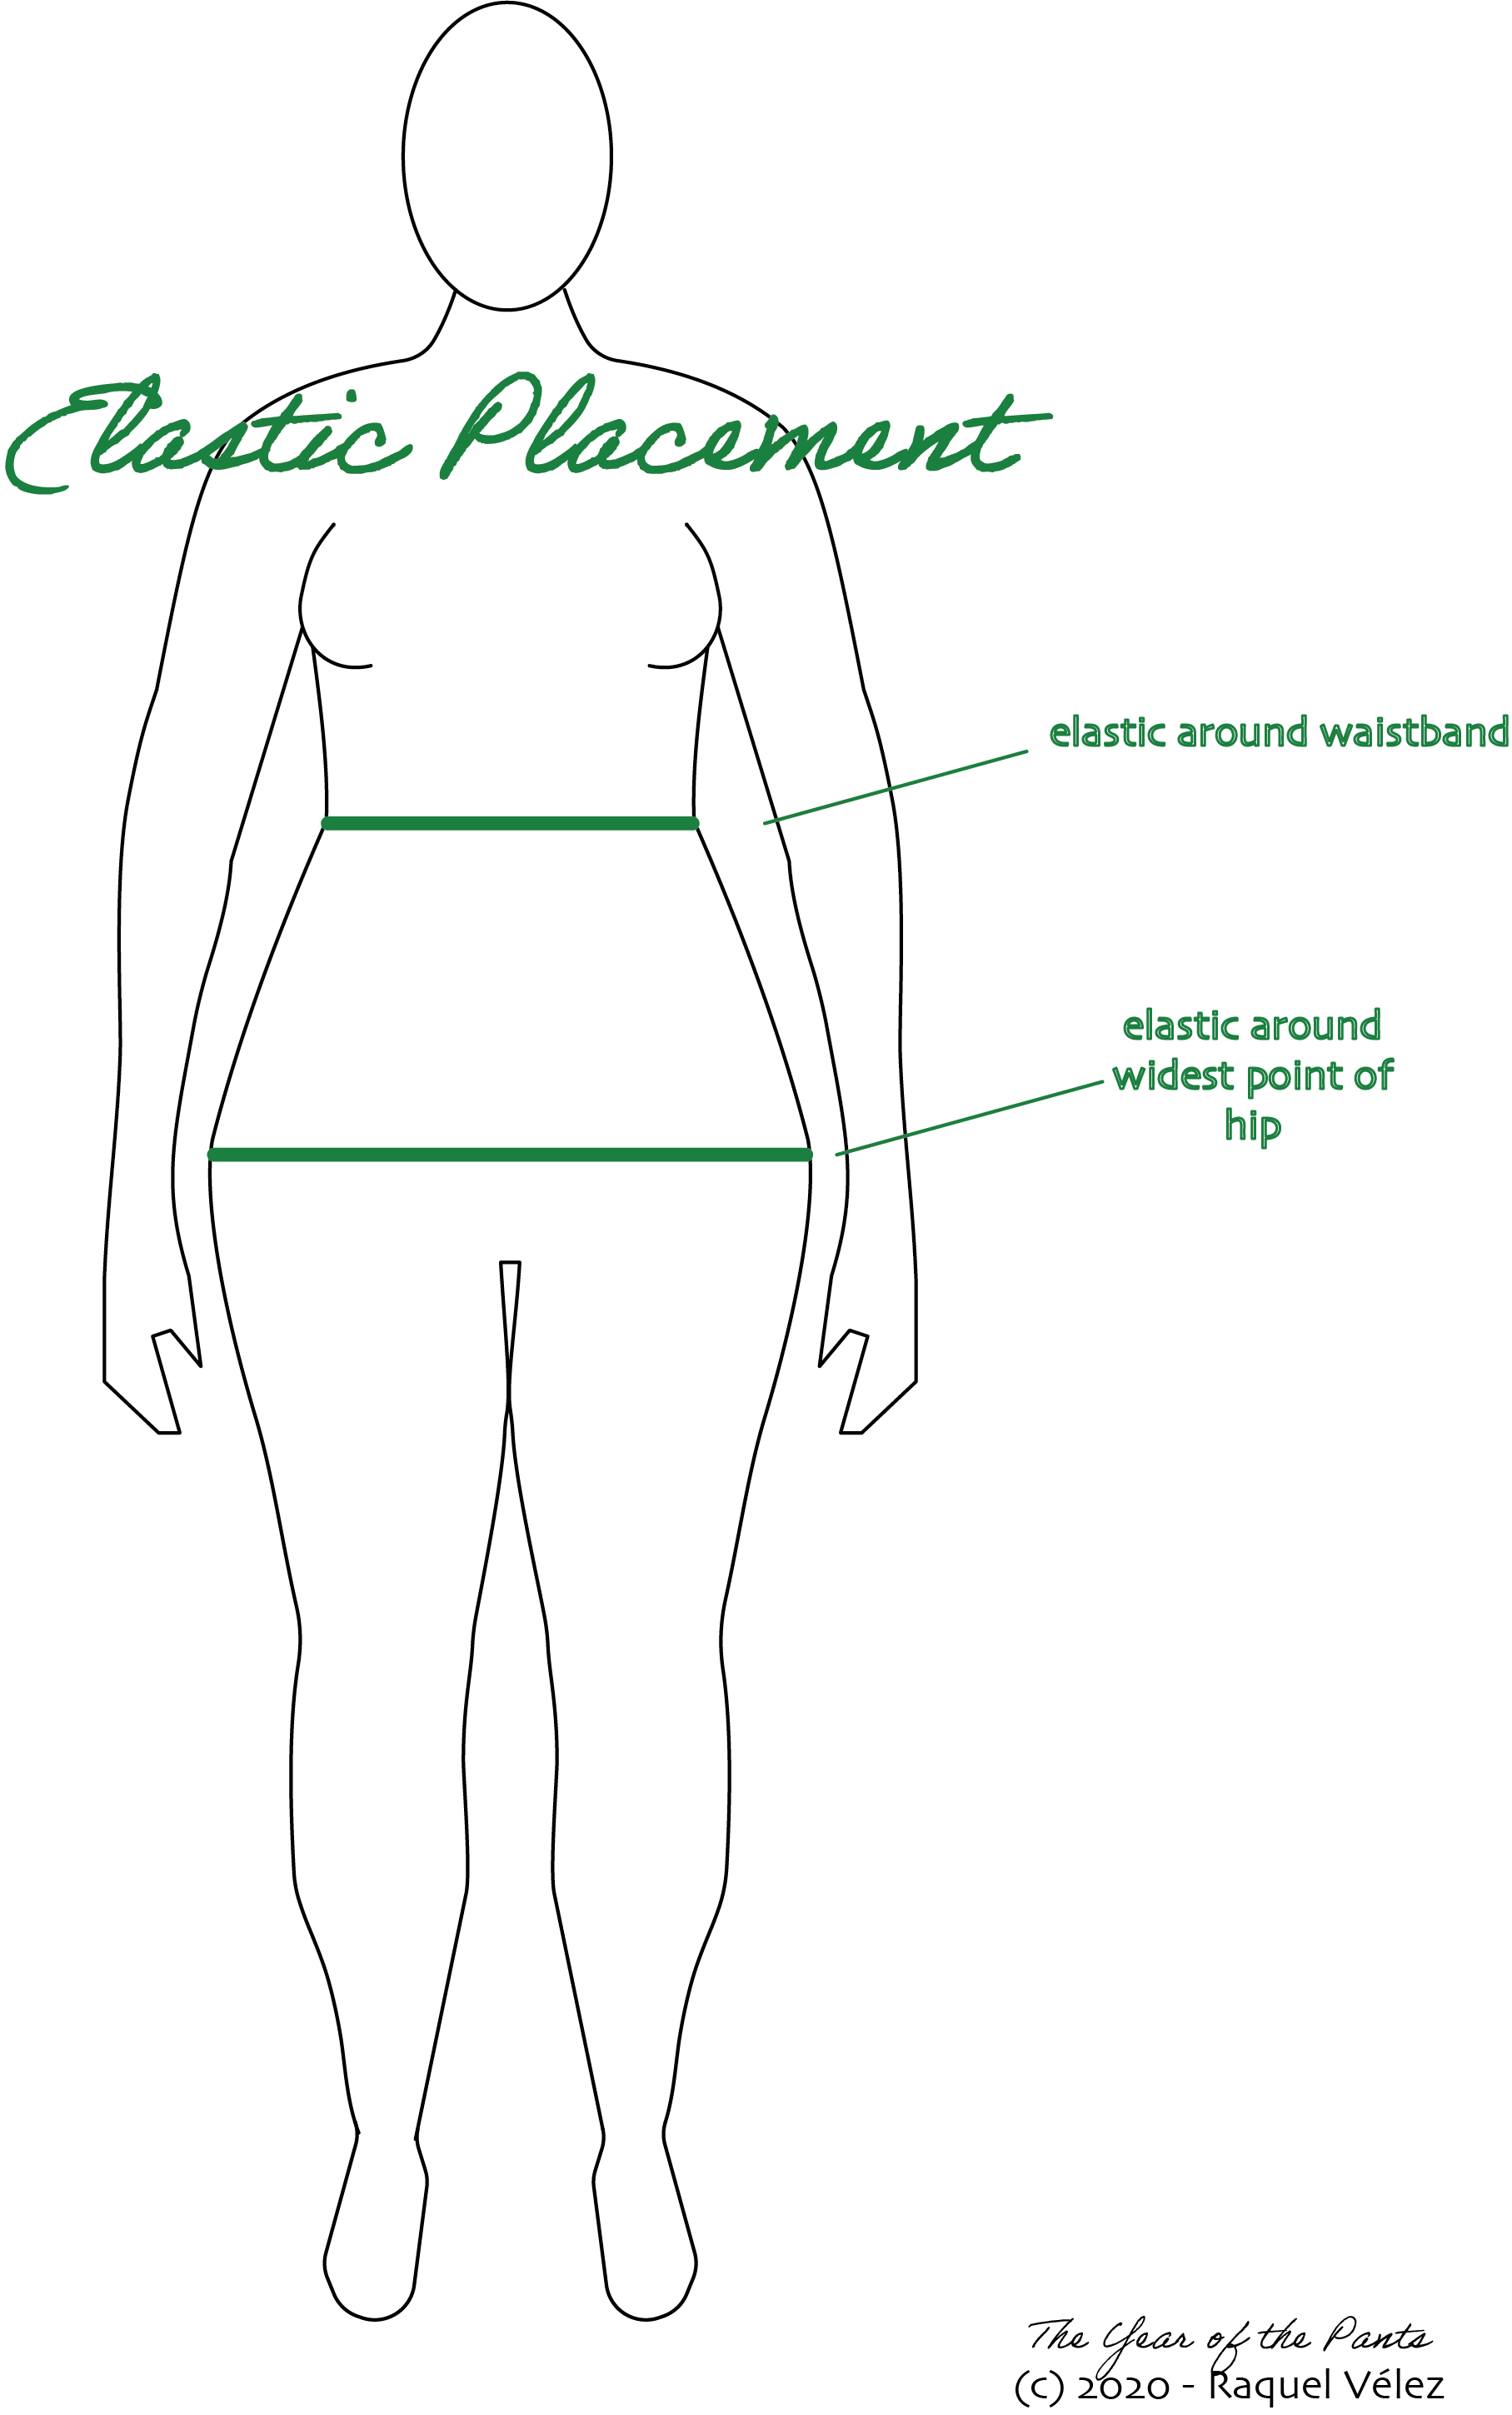
There's a bit of a disagreement on where the waist lies, btw: some people say it's the smallest part of your body (though for some that's right below the breastbone); others say it's where the waist bends if you bend to the side, teapot-style. They're the same for me, but if they're different for you, I'd recommend choosing the teapot. I think the resulting proportions will be more comfortable.
Once you have the elastic tied around your waist and hips, you and your buddy will take the following series of measurements. I tend to start from top to bottom, flipping between horizontal and vertical as it makes sense to me. Once you do it a few times, you'll figure out a method that works for you.
As the person being measured, stand up in your natural stance. Wear close-fitting but not tight clothes, e.g. leggings and a tank top (or underwear, if you're that comfortable with your buddy!). Stand on a thick book, barefoot, and breathe out. (If you're making pants that require specific shoes, then do wear those.) Try not to hold any tension in your body, as that will throw the measurements off. Also don't try to have the perfect posture you think you're supposed to have; your clothes will feel weird if you make them fit for the person you aren't every day.
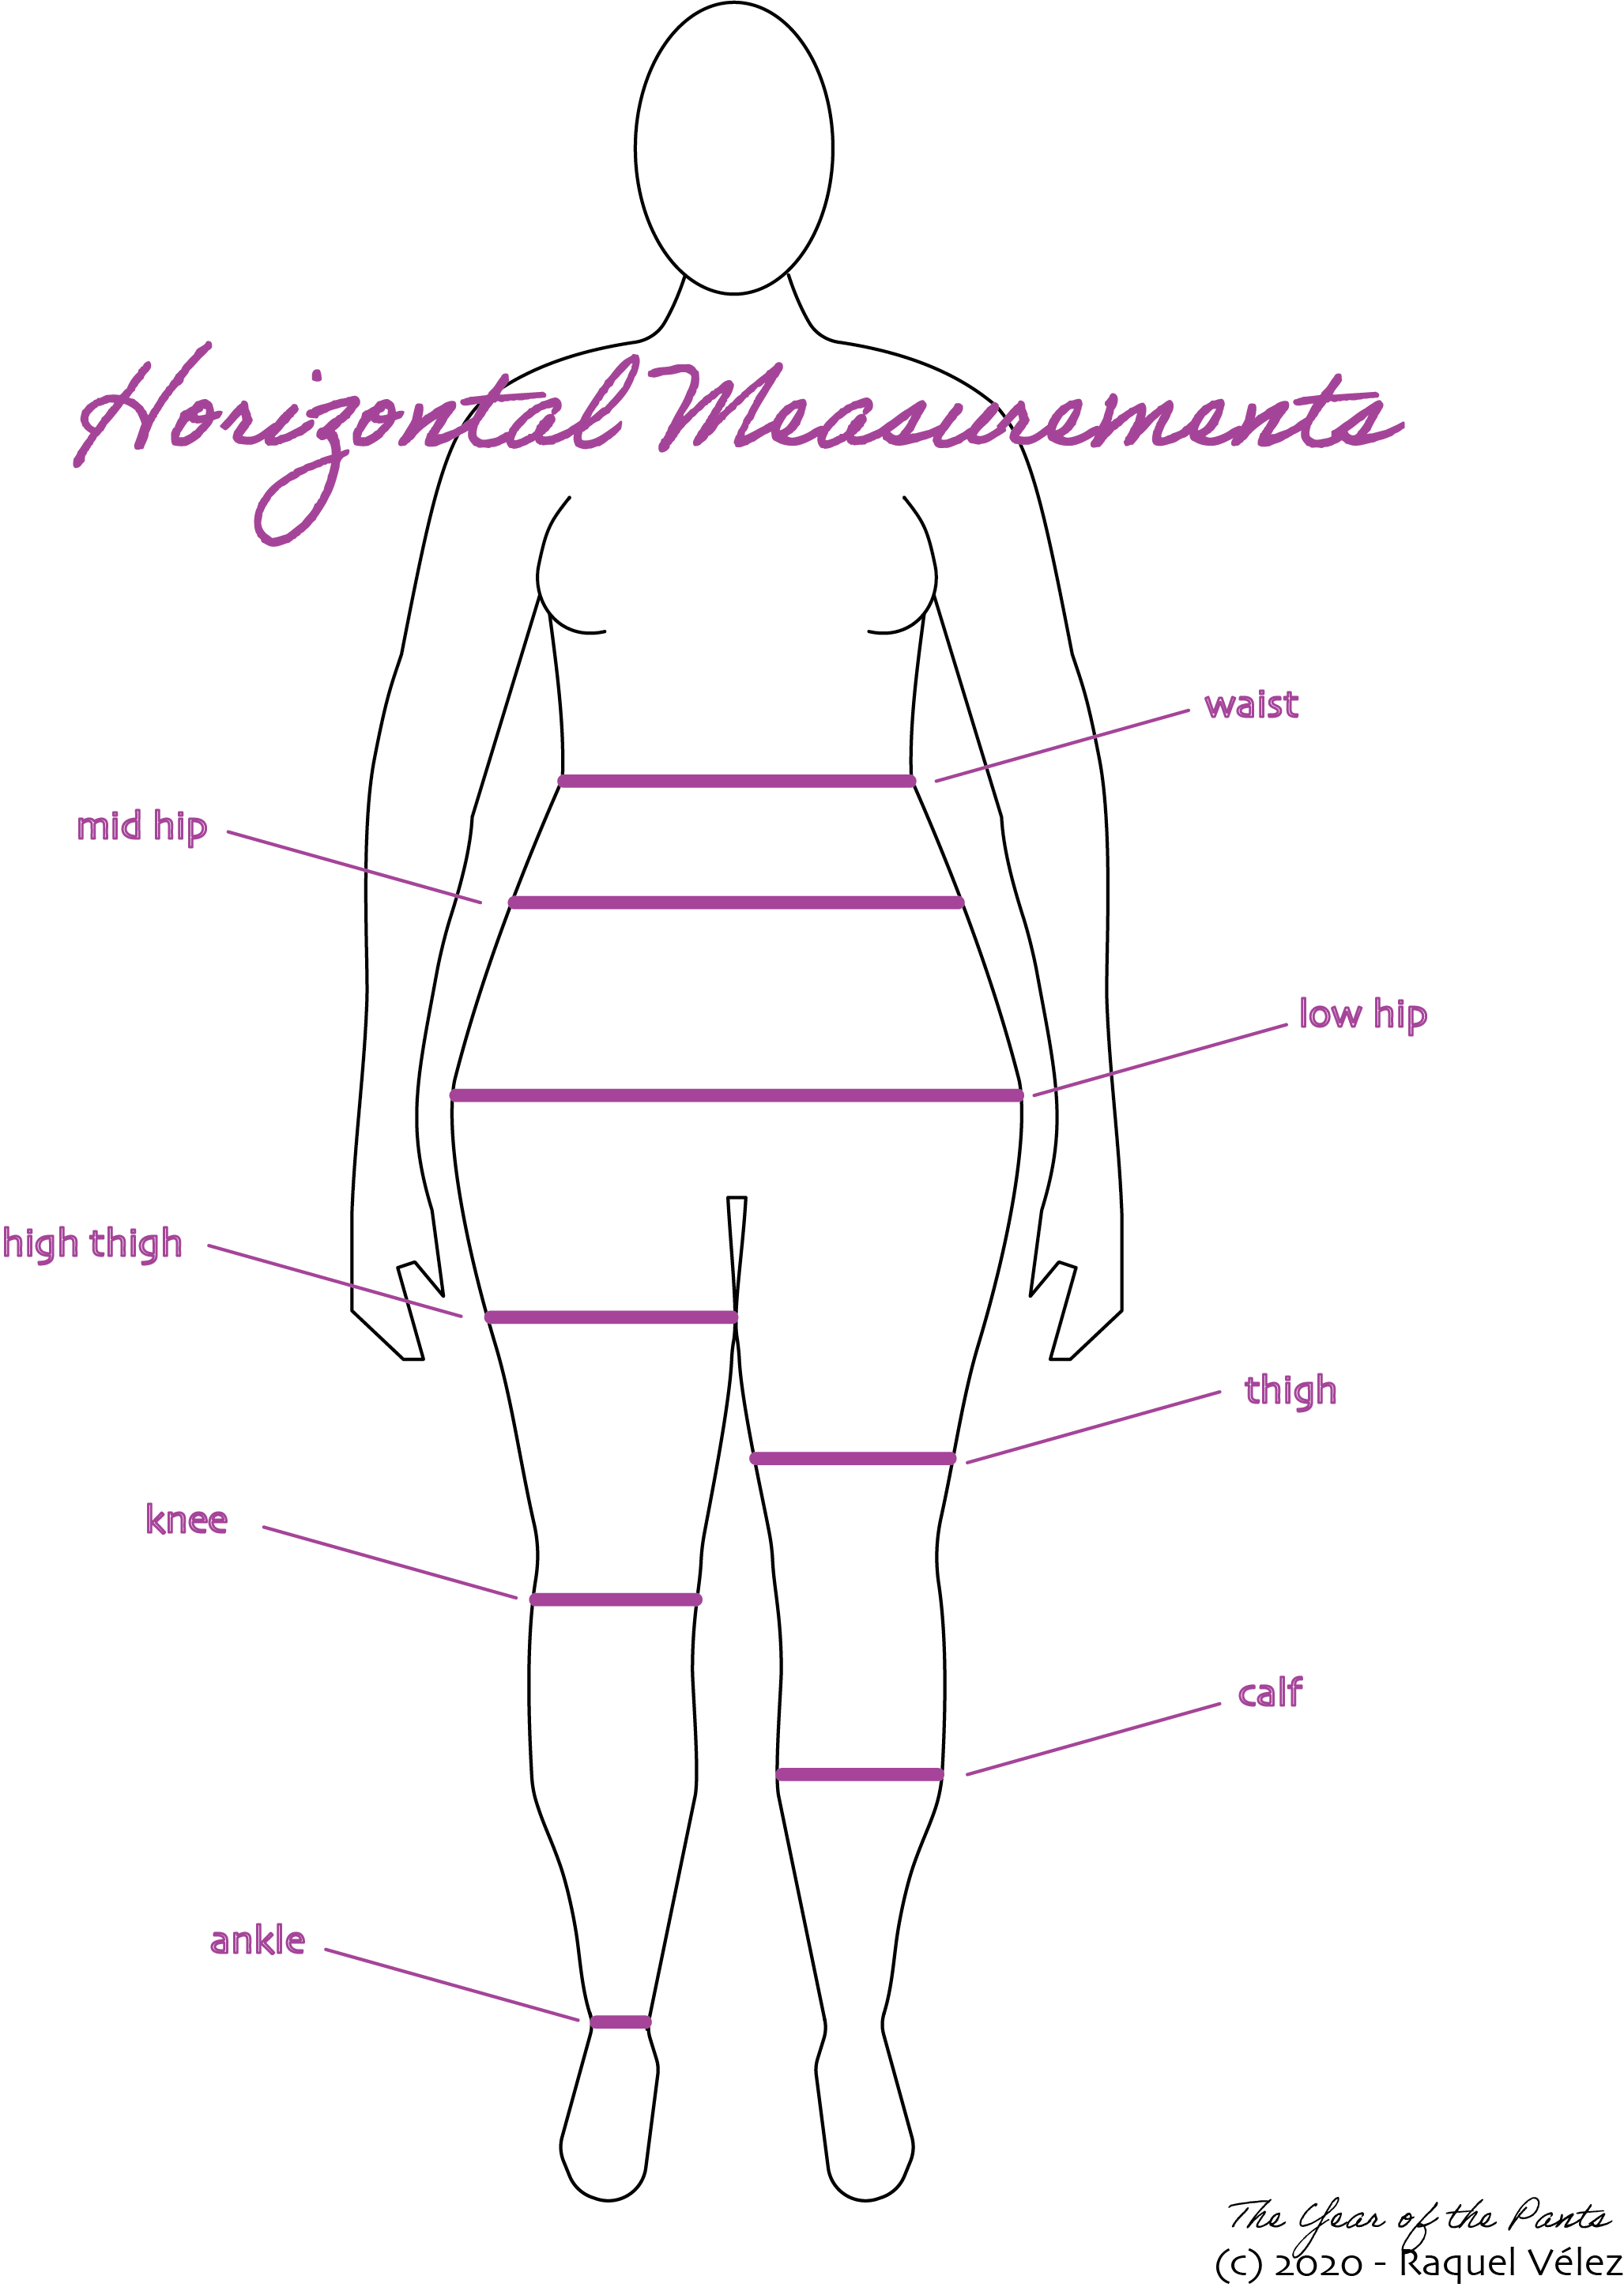
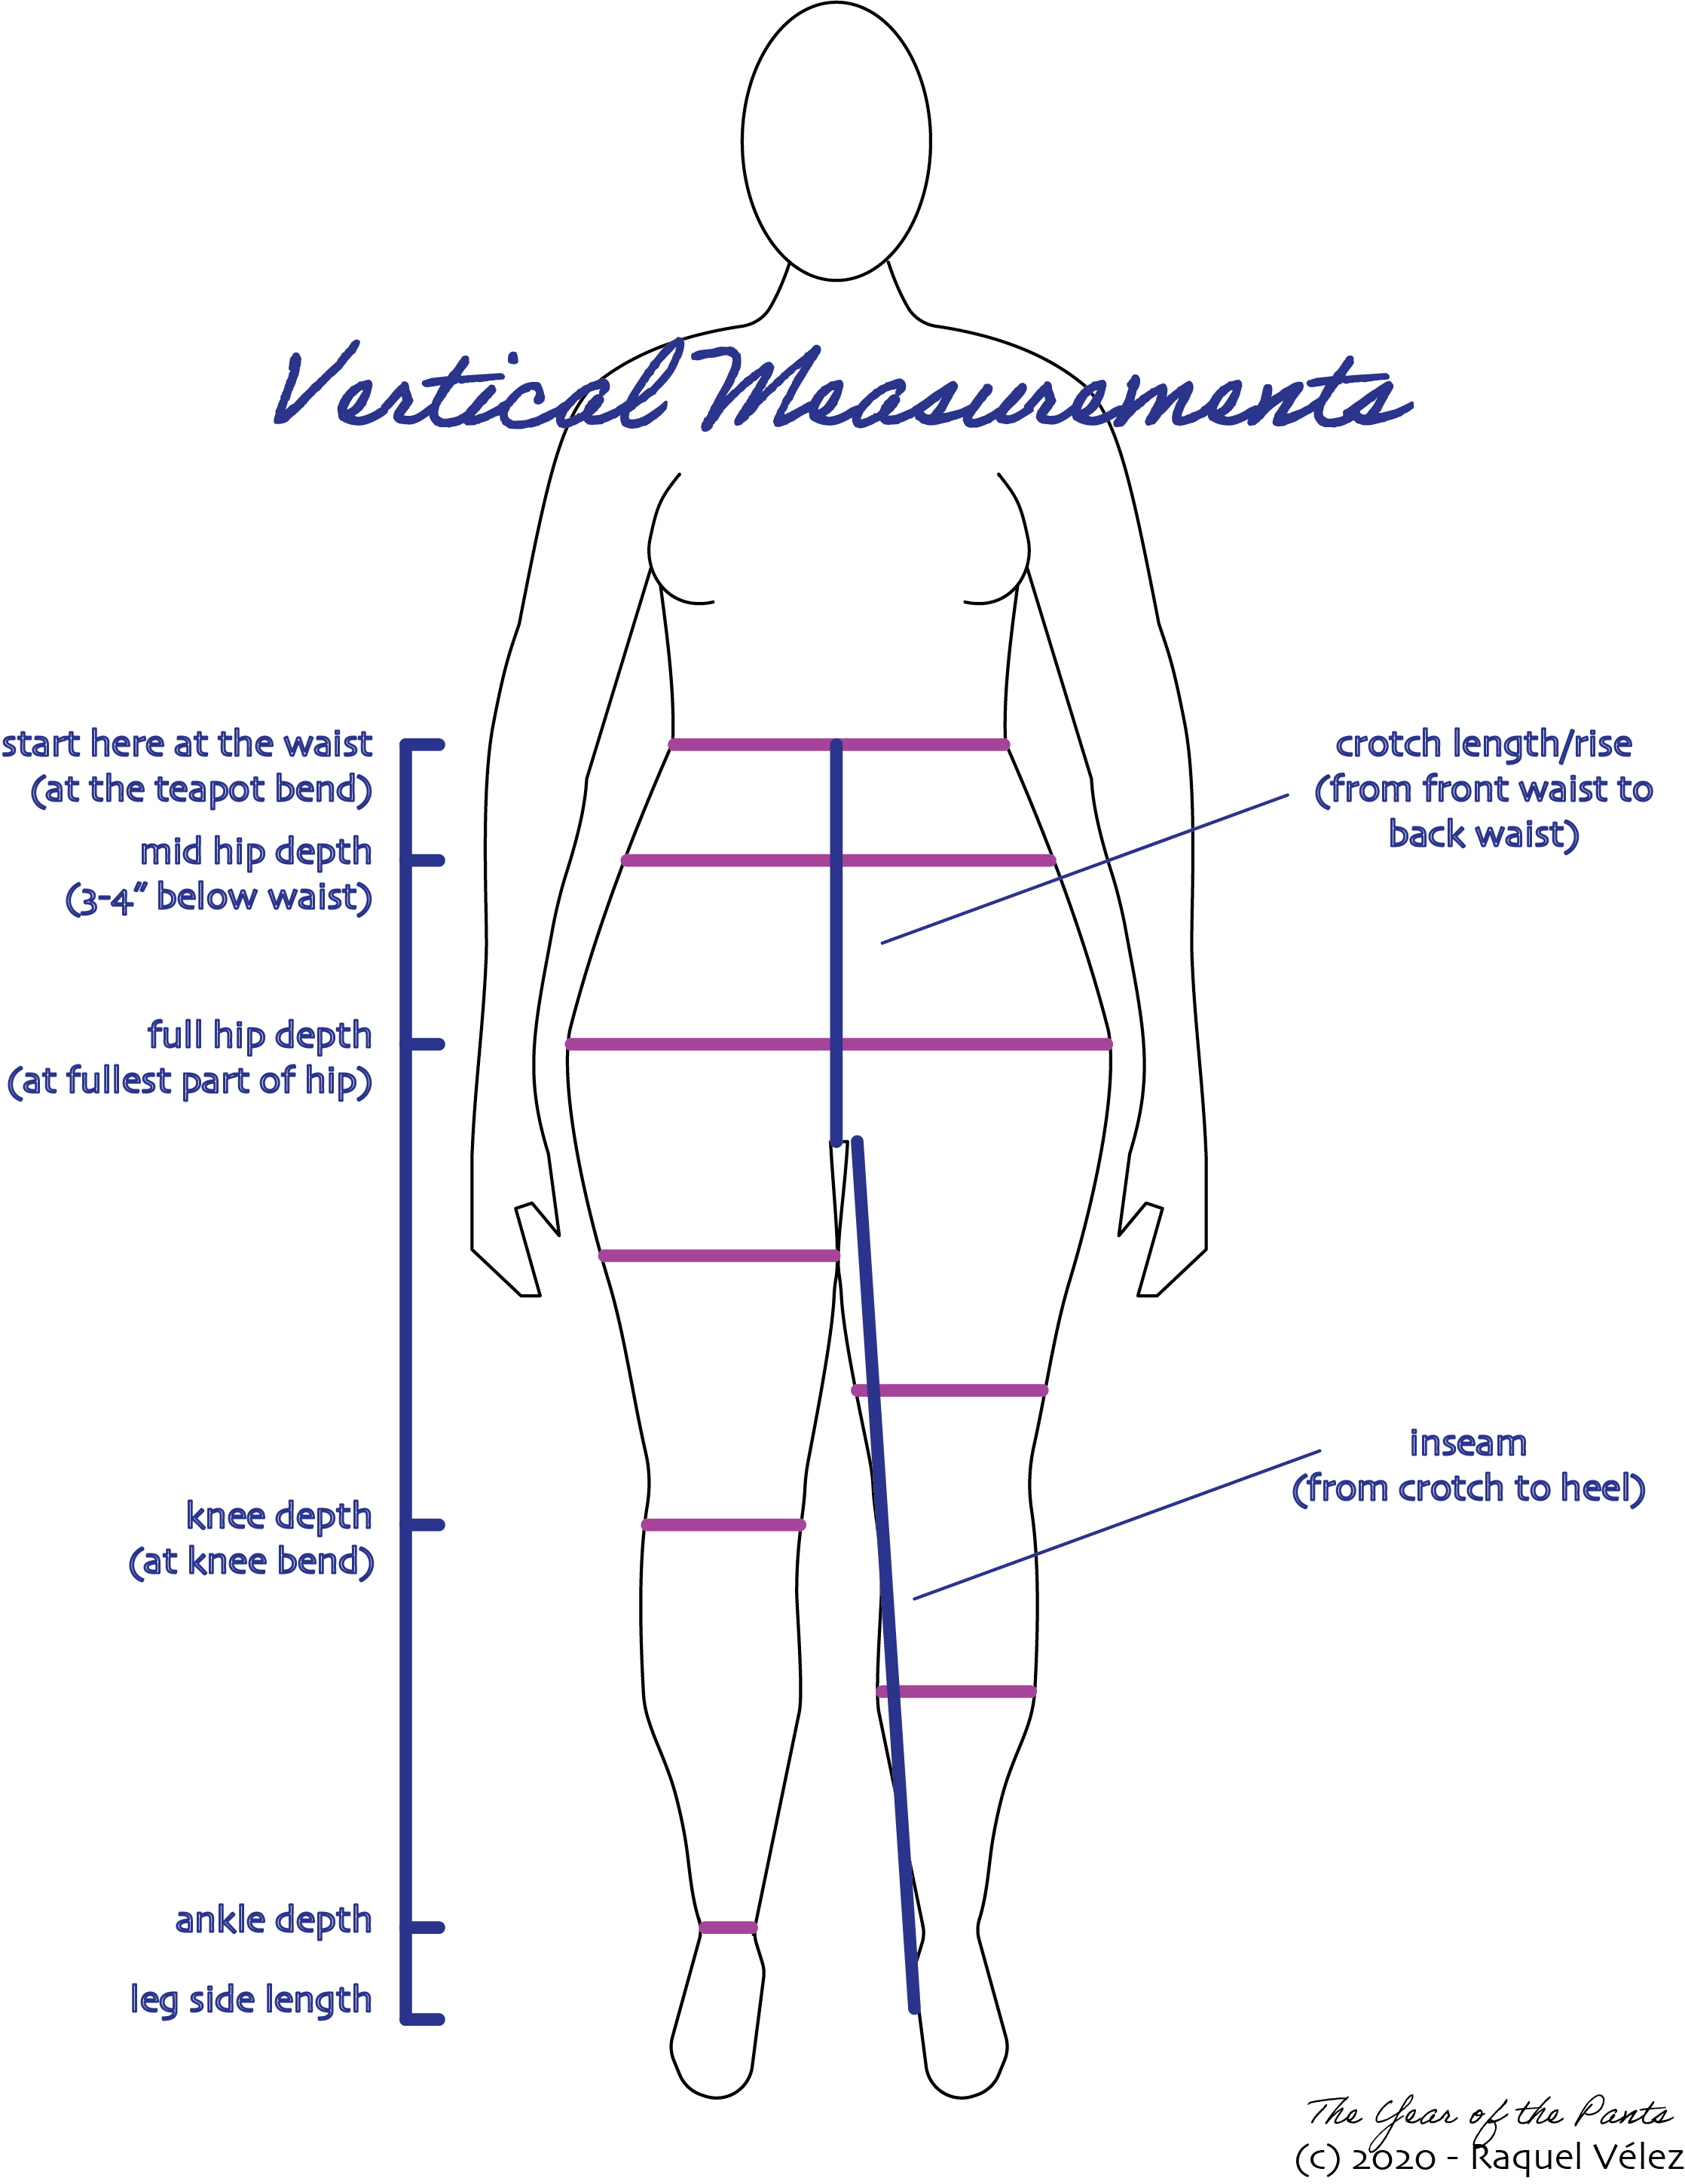
Using either the top or the bottom of the elastic as your reference points (be consistent - that quarter inch/half centimeter makes a difference!), take the measurements. Horizontal measurements are taken parallel to the ground (this is why it's good to have a buddy; if you're taking them by yourself, you'll be tempted to bend over and distort the numbers, so try not to do that 😅). Vertical measurements should follow the line of the body, except for the inseam. Note that the "mid hip depth" is generally taken around 3-4 inches below the waist. The important thing is to have some measurement in there, so that you can guess at the curvature of the side body between the waist and low hip.
The trickiest measurements here (from a human-to-human contact standpoint) are the inseam and the crotch length/rise. For the inseam, hold the measuring tape as close to the inside of your crotch as is comfortable for you, then let your buddy bring it down to your ankle or heel (or wherever you want your pants to end). Front-to-back doesn't matter quite as much; aim for just a little forward of the middle (if that makes sense).
The crotch length/rise involves holding the measuring tape at the waist elastic in front, going through the legs, and back to the waist elastic in back. Again, you want it to be as snug as you feel comfortable, but not so snug that it's constricting movement or affecting the natural arrangement of your body.
Okay! Those are the measurement basics! Everyone does things differently; I actually like to take even more measurements to account for extra booty or extra belly (e.g. full hip depth at center, side, and back, which may all be slightly different, depending on the curves of your body; they're certainly different on me). I also recently learned that some people define the low hip as the point where the hip creases when bending the leg, frog-leg style. Mine is significantly higher than the fullest part of my hip, which could prove interesting in future iterations!
What do you think? Was this a useful/helpful post? I can do more technical ones like this or I can go straight through to the making of the pants... let me know in the comments below or on social media!